
December 19, 2008

Water & Underwater in modern Webdesign — article + illustrations + tutorial.
I've seen a lot of designs with water for the past years, and you know what? Composition of all of them is extremely same, but the difference is in quality. I think you'll see & check it out by yourselves...
First take a look at Freeger's designs:


Its very good variants, look at the small details, they are perfect. Main components of illustrated water are: bubbles, drops, light & shadow. At first image water is almost black, sky have wonderful colors. At second water is extremely transparent, but it also looks good! — design by Freeger.

These two variants are almost same, but quality of creating water and underwater is different. That's layouts by:
Depthskins & iji design.
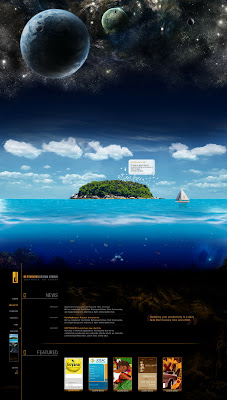
Using space, sky, water & underwater:


These two variants are almost same, but quality of creating water and underwater is different. That's layouts by:
Depthskins & iji design.
Light water designs


Water is light and there are trunks at both designs. I thinks in some cases it is very important attribute such as fishes and corals. Designs by dreamture, Pirogov & TITO
What's left:
These design are good, but composition is almost same. Enjoy: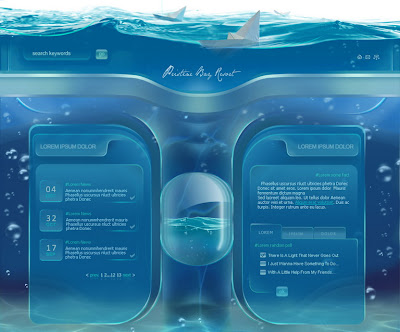


Dark water, white water, underwater. Works are by: Nedz-13, shakis, TITO, tehasequence, chammex & sclp.
Creating water/underwater in photoshop.
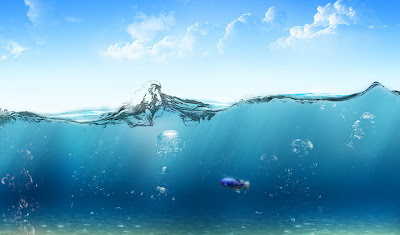
We'll need some photos of water:
Download from Ifolder
Download from DepositeFiles
1) Create new document. Choose some photos from archive. Paste this photos in 1 document in PS.
Make every layer Multiply. Paste photos such way to create 1 line.

2) Than with help of levels try to get image without those gray background. If levels cant help you — use eraser. You must get ideal water.
As a result we get nest:

3) Then create a new layer. Use linear gradient to colorize it.In places where our new layer contact with the water use gaussian blur.

4) Create new layer upper than background layer. Make it Overlay. Took the brush tool, it must be blured, radius about 100px, Opacity near 10-15%, color: white or light-blue. And begin to draw there, creating small lightnings near the top of the water. Then use sharp tool to add some sharpness.

5) Create one more layer. Make it Multiply. Took same brush but change color to more dark-blue and draw at the bottom.

6) Ok. Now create sunlight.
New layer, fill it with any color under water level. Make Fill 0. Go to layer effects & turn Gradient Overlay on. Chose Noize at the color gradient tool. Add Transparent — on. Then chose needed angle of slope of rays. Close Effects window. Rasterize effect. Make it like Luminocity.
Make rays transparent at bottom with gradient mask.
Then copy layer and hide it. Blure previous layer with Gaussian blur at 2-4 px. Make layer 80% transparent. Open our copy hidden layer and erase some rays of light at the places where we have darkness or shadow.

7) Add bubbles. Go to our archive with images, chose some photos you like, paste it to our image, make it suitable size. Make it like Screen. Play with levels. Erase some edges with blured eraser.
* Some photos need inversion (Ctrl + I)

Than we get next:

8) And now we must make bottom.
Find image like that: http://www.sxc.hu/photo/551470
Paste it to photoshop. Make it Screen, play with levels. Make Opticaly 30-50%. Than make it upper than gradient mask, it must be transparent at the end. Than we must make our texture whole. Use gradient mask for edges.
http://www.sxc.hu/photo/551470
Opacity 30-50%.

Copy this layer, play with Opacity. With eraser erase some parts of this copied layer.

9) Than create sand. Again new layer. Fill it with color of sand. Noize it. Make gradient mask. Make Opacity 40-50%.
Opacity 40-50%

Ready! Hope you like it. Original tutorial from makepizdato forum.
Tutorial
Creating water/underwater in photoshop.

We'll need some photos of water:
Download from Ifolder
Download from DepositeFiles
1) Create new document. Choose some photos from archive. Paste this photos in 1 document in PS.
Make every layer Multiply. Paste photos such way to create 1 line.
2) Than with help of levels try to get image without those gray background. If levels cant help you — use eraser. You must get ideal water.
As a result we get nest:
3) Then create a new layer. Use linear gradient to colorize it.In places where our new layer contact with the water use gaussian blur.
4) Create new layer upper than background layer. Make it Overlay. Took the brush tool, it must be blured, radius about 100px, Opacity near 10-15%, color: white or light-blue. And begin to draw there, creating small lightnings near the top of the water. Then use sharp tool to add some sharpness.
5) Create one more layer. Make it Multiply. Took same brush but change color to more dark-blue and draw at the bottom.
6) Ok. Now create sunlight.
New layer, fill it with any color under water level. Make Fill 0. Go to layer effects & turn Gradient Overlay on. Chose Noize at the color gradient tool. Add Transparent — on. Then chose needed angle of slope of rays. Close Effects window. Rasterize effect. Make it like Luminocity.
Make rays transparent at bottom with gradient mask.
Then copy layer and hide it. Blure previous layer with Gaussian blur at 2-4 px. Make layer 80% transparent. Open our copy hidden layer and erase some rays of light at the places where we have darkness or shadow.
7) Add bubbles. Go to our archive with images, chose some photos you like, paste it to our image, make it suitable size. Make it like Screen. Play with levels. Erase some edges with blured eraser.
* Some photos need inversion (Ctrl + I)
Than we get next:
8) And now we must make bottom.
Find image like that: http://www.sxc.hu/photo/551470
Paste it to photoshop. Make it Screen, play with levels. Make Opticaly 30-50%. Than make it upper than gradient mask, it must be transparent at the end. Than we must make our texture whole. Use gradient mask for edges.
http://www.sxc.hu/photo/551470
Opacity 30-50%.
Copy this layer, play with Opacity. With eraser erase some parts of this copied layer.
9) Than create sand. Again new layer. Fill it with color of sand. Noize it. Make gradient mask. Make Opacity 40-50%.
Opacity 40-50%
Ready! Hope you like it. Original tutorial from makepizdato forum.


Post a Comment